Ring Sizers
http://www.thingiverse.com/thing:11458
118min/1.81m/$0.74
I want to make rings as a project for my students so I dug up my old plastic ring sizer. It was missing 2 rings so I looked up new ring sizers on Amazon. The decent ones were like $15, less if it's plastic. Then I realized I COULD PRINT MY OWN!!!!
On to Thingiverse and there they were! Ring sizers!
Greatest 3D printing moment so far!
I loaded it up. Tried blue tape + glue and then I heard things falling out of the printer. Came to find this epic fail:
Cleaned it up a bit and added a raft. Worked out MUCH better, although I had to use a lot of material with the raft now. But the rings work great and separate very well from the raft.
3d printing adventures with my Flashforge Finder and Creator Pro!
Showing posts with label Crash. Show all posts
Saturday, 4 June 2016
Megaman X - fail and fix
Megaman X - 150% scaled up
503min/21.53m/$1.63
One of my students asked me to print this Megaman X figure. It was small so I scaled it up so the details could show. I also put the print quality to Fine so that the curves would come out nicer.
It took me 3 tries to get this right as demonstrated below.
1st try: raft + supports, standard suppose from Flashrpint. Failed because supports in both arms fell.
2nd try: added custom supports to the Flashprint ones. Left are OK, right arm fail as support broke.
3rd try: went nuts with custom supports for the right arm. SUCCESS!!!
The build time is pretty crazy. Almost 10hrs! This is easily the biggest print I've done.
Partway through I checked my 3rd print to see this and was relieved I finally got a good configuration to print.
D&D Earth Elemental
D&D Earth Elemental
137min/7.37m/$0.56
mz4250's elemental series are all pretty awesome. I had a bit of trouble printing this one. I thought it was a pretty solid design with supports in but I got a few fails. I thought it would stick well to a new sheet face. Nope.
So I added some glue. Nope.So I added tape and glue. Nope.
Turns out all I needed was a raft!
Great figure. Put those rafts in!
Friday, 3 June 2016
OpenForge Rowboats (fail and fix)
OpenForge Rowboats for D&D
Rowboat and 2 oars:
100min/6.49m/$0.49
I tried to make one set of medium sized rowboats with oars. I didn't use a raft and naturally it came undone even on blue tape with glue.
So I added a raft, and it came out quite fine.
But I wanted a boat so that more characters could fit on it. I uploaded the design into Tinkercad and then just scaled it to be bigger. It was quite easy. The limits of my Finder are 14cm x 14cm for the base so I made this reasonably big.
Realizing I would need a giant raft and I was worried that such a large flat print would lift and get ruined, I decided to re-orient the part so I could use supports instead of the huge raft.
It turned out really well even though some supports got screwed up! Check out the dangling filament!
And finally the true test is adding figures. This one fits a party of 7. Scaling is good stuff!
Thursday, 2 June 2016
Open Forge Wood Floor - Failure and Fix
I wanted to try and do some modular flooring for D&D but the problem was that a print of just ONE floor tile would take over an hour!
So I took the file for the wood floor and modified it by chopping off the base to make it thinner, and thus take up less time and material.
I haven't had trouble with parts lifting so I did a batch and let it run over night.
Then I got my most glorious screw up ever:
So I tried a test with speed settings, dialing it down to see what would happen, and maybe it would stick better also with glue and tape. Nope:
Tried speed setting again. Nope:
Then I decided to try a raft with the part 1mm off the build plate and adding supports to hold it.
SUCCESS! The supports and raft worked so there was no curling.
It actually turned out really well.
And here's the final product with the first disaster next to it.
Sunday, 29 May 2016
Flashforge Finder Filament Jam
So my 2nd Flashforge Finder has been mostly problems so far.
There were 2 filament binding jams in the actual filament roll which was a brand new one that didn't come with the printer.
People seems split as to how this is caused. In my opinion it is possible for it to be caused by the user, and the supplier. On the user side, if you unwound a bunch or the spool isn't tight, the filament can slip and bind itself. So maybe the first one was me when I noticed it got loose.
Now I've been pretty meticulous in tracking my prints. I record what I printed, how long it took and the converted cost. So that's why I can say that 67.39m later I got a 2nd jam on the sam spool and it's not my fault because 67.39m is a LONG ways away, like buried deep under lots of tightly wound filament and I seriously doubt unraveling a bit would affect it that far down.
The only solve for this is to cut the filament, untangle it and feed it back in.
It's hard to predict a tangle when it's 67m down into the spool so it looks like if I do a big print, I'll have to rely on luck for a bit unless I get some kind of system where I can redo the winding on spools.
Thursday, 26 May 2016
New Flashforge Finder Setup and CRASH :(
New Flashforge Finder Setup and Crash :(
With the end shaved a bit, you can push it in more easily.
You may remember my first photo on this blog was of my 2 Flashforge Finders and not just 1.
My goal was always to build a 3D printing hub, so I picked up the 2nd one and didn't open it until I felt I was at a level of expertise to be comfortable working 2 printers really hard for what I do for work.
Keep in mind, I really like the Flashforge Finder and this blog is pretty honest with any kind of issues I ran into. Just because you don't read about issues with other printers doesn't mean they're not there. That being said, I am considering buying 2 more Finders for my 3D printing hub.
SetUp:
There are lots of good videos on setting up your new Finder, most of which I watched before buying it.
Galen Law-Kun's is very good and I agree that the end-stop mod is not a bad idea because the default setting of your axis is to crash and stop, not just stop at the end.
David Watts also has an excellent one that shows the unboxing:
And he has a great follow-up: https://www.youtube.com/watch?v=PAmNhrl8TL4
In this article I'm just going to detail what happened to my set up, and all the problems and solutions I had.
So my 2nd printer is the exact same as the first. In retrospect I should have picked a different color. They have grey, yellow and
And here's my regular one:
First Issue - Tube Mod
After pulling out the 3D printer, removing the styrofoam and clipping the tie wraps on the both axis, you should add the tube for the PLA feeder even though it doesn't say you should (they do it in the videos above). This tube helps guide the filament from the feeder cartridge in the back to the extruder.
When I tried to push the tube into the cartridge this one didn't fit. It fit on my first one. But this was an easy mod.
Just take a knife and shave off the end of the tube at an angle so it can fit better. Don't shave it too much, just make an angle for the tube to fit better.With the end shaved a bit, you can push it in more easily.
This Finder came with translucent green. Since I have some already, I opened up some Flashforge translucent blue. I bought the Flashforge filament specifically to fit it into the filament caddy at the back of the printer. You do not have to use Flashforge filament. You can just have a reel on a stand outside of the printer. But if you want to fit your filament into the caddy you have to use their filament because the spool is smaller. Because I am moving my printer between 2 locations almost daily, I wanted the spool to be contained so I won't have to load/reload filament every time I move it.
When my first Flashforge filament spools are done, I will probably save them and reload them myself with other filament. (this is tricky, I'd have to do it a certain way to avoid binding/jams).
Your new filament spool will be sealed and the filament end will be tucked into the spool body. You can clip this bent piece off so that it will feed into the tube and extruder better.
Load the spool so that the free end of the filament is closest to the exit tube in the filament caddy as pictured below:
Now you might have to pull the filament spool out a bit to do this next part. Manually push the filament through the caddy hole and the tube until you see it come out the other end. DO NOT just feed it part way and spin the filament spool. This will cause it to unwind inside your caddy which could cause a jam latter..
And here's what it looks like when it is through the caddy hole. You'll note that there is a special black block on the pathway to your filament tube. This contains the electronics for the filament detection feature.
The side of the caddy has these electrical contacts which will activate the filament detection feature. This is simply a thing that checks to see if filament is present at this point. If you have the filament detection function on, it will go off when you run out of filament. This is handy if you're running to the end of a roll. This detection feature cannot detect how much filament you have left, it only tells you if it runs out at this specific point in the caddy.
When you're inserting the filament into the extruder unit, the instructions at Step 4 stay "4. Press the spring presser, and insert the filament into the filament intake".
The "spring presser" is the level on the left side of the extruder unit labelled below. That curved groove in the unit is for your thumb to follow it down to the lever. The "spring presser" is actually a lever that "unpinches" the drive gear that pulls the filament down. By pressing this, you can open it up to allow the filament to go in.
Sometimes you don't have to. Sometimes the drive just sucks that filament in, but this will allow you to get the filament in deeper.
Now that the filament is in place, you should calibrate your z-axis/build plate with the built in function that is under Setup. This is pretty quick and just involves turning the screws underneath your build plate all the way out, and then back in until you hear the high pitched beeping sound. There are 3 screws and this can be done in under 5 minutes easily.
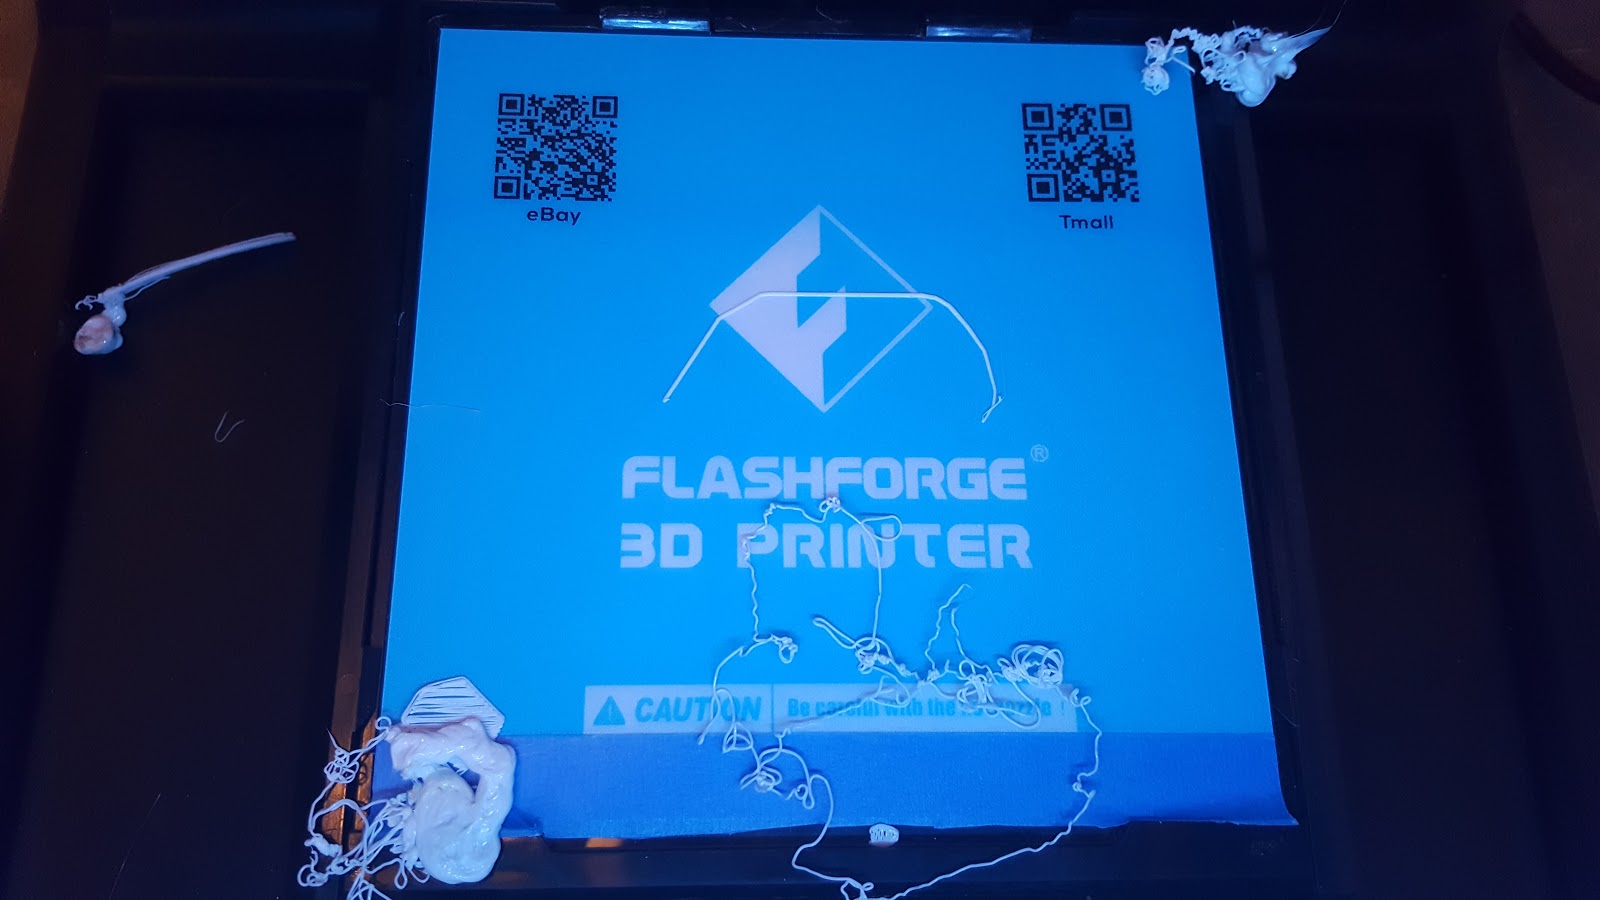
First Print - CRASH
The first thing I usually print is the 20mm cube that is built into the USB stick that comes with the Finder.
I set it up as normal and then let it print right away.
After a few minutes I heard a clicking sound. This was the sound of my extruder clicking because the filament wasn't feeding. I thought that was strange so I stopped the print, went to SetUp and pressed Load to let filament go through. It went through with any problem.
I cleaned my plate and tried it again. Clicking sound again. I just let it go longer and this time on top of clicking there was a grinding sound from my build plate. Looking at the build plate I could see it was actually vibrating!
So I stopped it and this is what I got:
not only is it a really bad print, but after removing the plastic I could see that my brand new print bed is DAMAGED! The filament head melted and scratch it! This means that the filament head is too low! It sucks because my first Finder just ran out of the box but somehow this one shipped with an offset filament head.
A quick email to my vendor and he told me I could calibrate the height of the filament head in Setup. So I tried the Z calibration function.
Reading online I know that a proper calibration is done on other machines by starting with the extruder head off of the plate by a few milliemtres. Then you put a piece of paper underneath it and lower the z-axis until it is just slightly pinching the paper when you move it back and forth. You have to literally keep sliding the paper back and forth until you feel some friction but not to the point where you can't move the paper.
I will see if I can get better pics of this process or even do a video to explain it better. It is a simple fix that is effective.
NEW RECOMMENDATION: Before you calibrate your build plate, calibrate your z-axis for your extruder so that you know it won't crash the build plate and melt it!!!
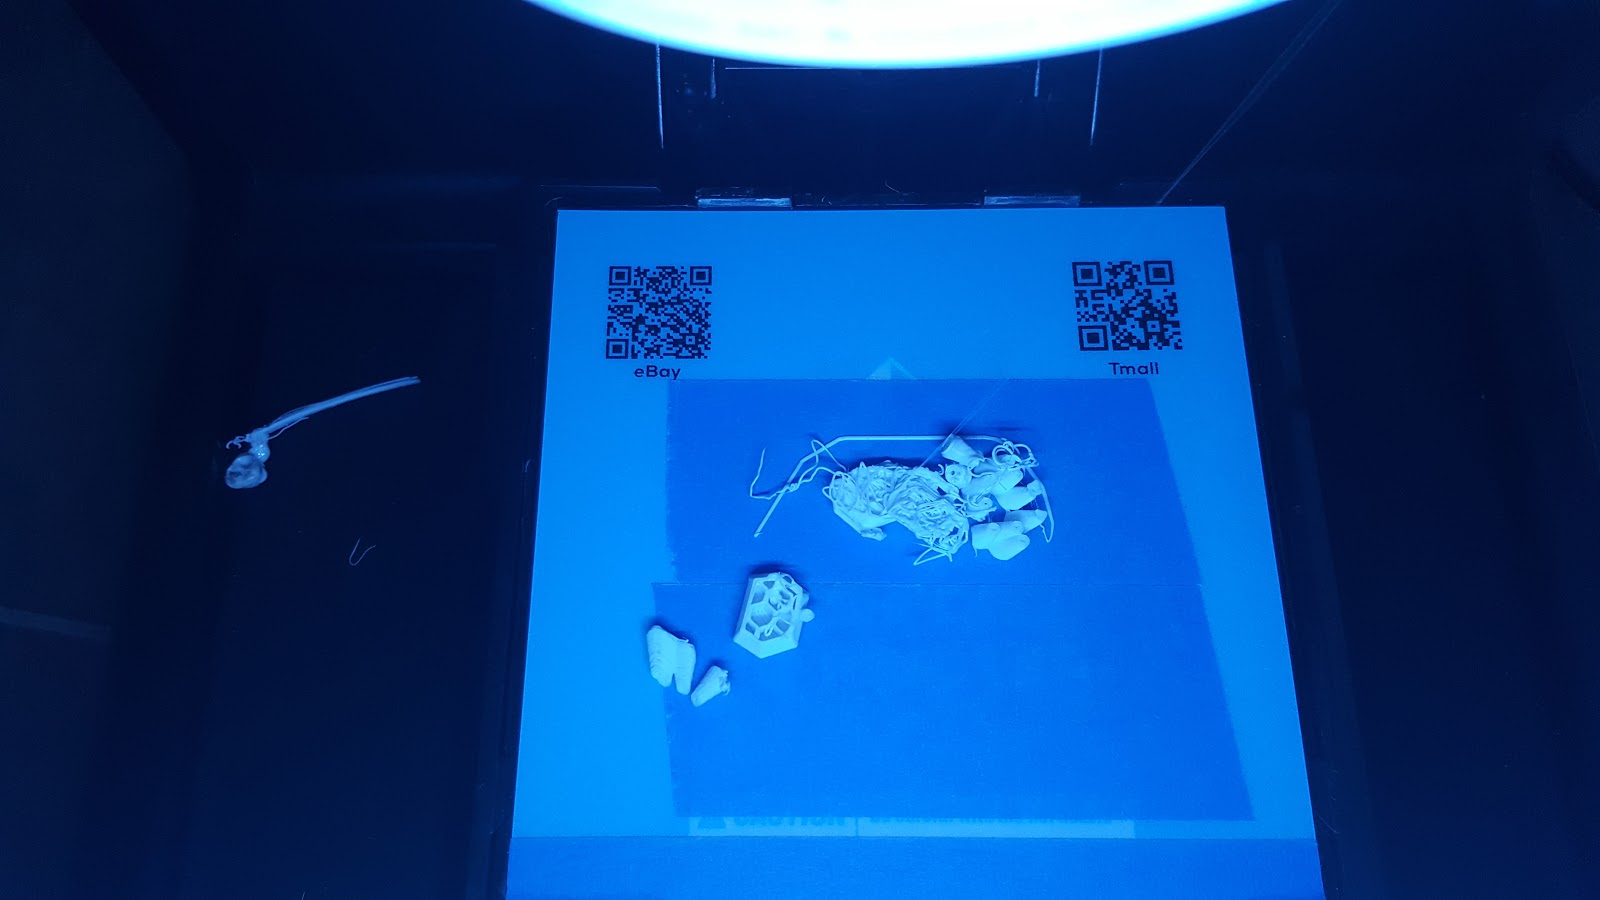
After adjusting the extruder height I printed some 20mm test cubes:
As you can see there's a bit of a lip on the bottom layer suggesting that my z-axis may be a bit too close. I can fix this by either adjusting my z-axis or printing with a raft in some models.
Monday, 23 May 2016
First CRASH
Tonight my printer crashed.
I'm not even sure how it happened. I've been printing lots of stuff and decided to set a big one before bed. I got up to the sound of my build plate crashing on the ground!
When I got there i saw this:
As you can see the extruder burned through the tape and melted the actual plastic on the top layer of the build plate. From my guess, the extruder crashed into the build plate early, but kept on going through it's pattern, slowly pushing the plate off until it fell out completely.
The damage on the actual plate is quite bad:
The build lines are burned into the plate. This is going to make for tough leveling of the first layer going forward.
I recalibrated the bed level and two of my screws were off by about a quarter turn!
Looking back at my log, I think I haven't calibrated this for about 25 prints.
So the lesson learned here is:
1. Wait for your first layer to be put down before leaving it
2. Recalibrate your build plate every 5-10 prints!
I've asked my supplier to order up new plates and a new plastic covering. I'm not even sure how to fix this, but I'm going to print the thing that made it screwed up and we'll see how accurate it is.
Saturday, 21 May 2016
Bear Warrior - 28mm - Custom Supports
Bear Warrior of the Ironwood - scaled to 166.66% (28mm)
161min/10.44m/$0.79
http://www.thingiverse.com/thing:1077487
I realized I printed the last Bear Warrior too small for D&D. I needed to scale it 166.66% for it to be 28mm. Dutchmogul actually mentions this on a couple of his files.
So I scaled it up using FlashPrint's scale function and when I printed it, halfway through I got this mess below.
The support for the arm didn't hold. It actually fell over. I felt his could have been several things, but since my 18mm one didn't do this, I thought I'd try it again.
Looking at the mess, it's clear that when scaled up the support isn't holding from the weight. It's ok at 18mm but when you get bigger, there's more material to hold and some things don't scale up well.
Adding supports is easy. Just click Add and then click the spot on the base you want to start and hold down the mouse button to extend it. The support will be RED if it is not valid or GREEN if it works.
I went nuts and took no chances. The last support is red just to show how you can extend it.
With my new supports in, I now created the g code and the approximate time is 2 hours and 41 minutes which is longer because of the crazy supports I added. This time to also not take chances, I added a raft. I rarely add rafts because they sometimes stick too well to the base of things.
Result: SUCCESS!
The axe hand came out really well and my supports worked great!
Minor Error: I missed the support at the back of the model. But despite this the model came out fine.
Everything chipped off fine. Even the raft came off the base quite easily!
And here's the final process with my two mistakes and the good one! So far 3D printing has been a very enjoyable learning process, but one where learning from your mistakes is highly rewarded!
161min/10.44m/$0.79
http://www.thingiverse.com/thing:1077487
I realized I printed the last Bear Warrior too small for D&D. I needed to scale it 166.66% for it to be 28mm. Dutchmogul actually mentions this on a couple of his files.
So I scaled it up using FlashPrint's scale function and when I printed it, halfway through I got this mess below.
The support for the arm didn't hold. It actually fell over. I felt his could have been several things, but since my 18mm one didn't do this, I thought I'd try it again.
Looking at the mess, it's clear that when scaled up the support isn't holding from the weight. It's ok at 18mm but when you get bigger, there's more material to hold and some things don't scale up well.
FlashPrint's support function is pretty good. You can select two types of supports (but can't mix them). Treelike will allow you to make angles and branches. Linear just goes straight up. I have only done treelike because I felt linear uses too much support material. You can select either one from Supports Options.
You can start by clicking on the big A for Auto Supports. Most of the time this works totally fine but since my right arm support wasn't working, I decided to add a bunch.
Here's what the autosupports look like. You can see the big angle at the left in green that keeps falling off on my model.
I went nuts and took no chances. The last support is red just to show how you can extend it.
Result: SUCCESS!
The axe hand came out really well and my supports worked great!
Minor Error: I missed the support at the back of the model. But despite this the model came out fine.
Everything chipped off fine. Even the raft came off the base quite easily!
And here's the final process with my two mistakes and the good one! So far 3D printing has been a very enjoyable learning process, but one where learning from your mistakes is highly rewarded!
Subscribe to:
Posts (Atom)


